Showing posts with label Gorgeous Grape Sheer Ribbon. Show all posts

Saturday, May 27, 2023

Paper Napkin Card!

 Paper Napkin Card!

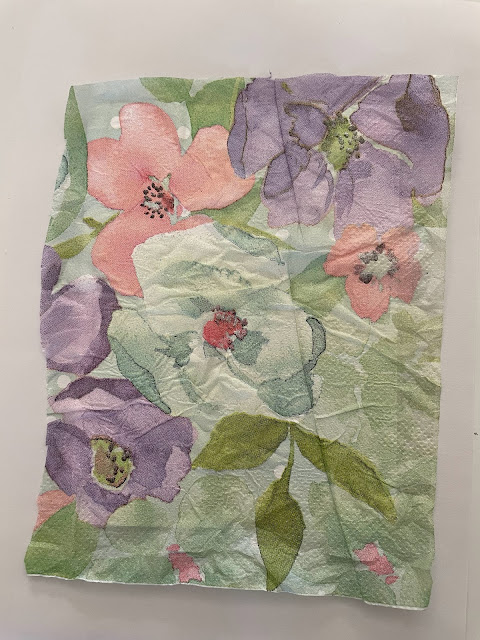
Paper napkins are not just for cleaning your face anymore! You can also make gorgeous cards with them!

I taught this technique to some new stampers today, they will never look at a paper napkin in the same way! 

The Dollar Stores in my area have a great selection of paper napkins.

Directions:

Cut a Gorgeous Grape Card Stock Base to 8 1/2" x 5 1/2", score at 4 1/4".

Cut 2 pieces of Basic White C/S: 1 @ 4" x 5 1/4" and 1@ 4 1/8" x 5 3/8".

Remove all the white backing from the paper napkin until you are left with just the patterned layer. 


Cut the paper napkin a bit larger that the 4" x 5 1/4" Basic White C/S layer. Scrunch the napkin up in your hand. Gently un-scrunch and flatten it out. 


Lay down a scrap piece of paper onto your work surface. Using a "glue stick" (like you used in school), completely cover the Basic White C/S layer with glue. Then lay your napkin, right side facing out onto the card stock and gently smooth it out. 


Turn this layer over. Using Multi-Purpose Liquid Glue or Stampin' Seal, glue the excess of the napkin to the back of the layer. 

Then attach this layer to the slightly larger Basic White C/S layer.


Attach these layers to the card base using Dimensionals.

Stamp a sentiment using Gorgeous Grape Ink onto some Basic White C/S and punch out with the 2" Circle Punch.

Punch out a Vellum Decorative Circle. Attach the sentiment circle to the Vellum using Dimensionals. Then attach it to the card front.


Add a Gorgeous Grape Sheer Ribbon Bow and some cute Brushed Brass Butterflies to finish off the card. 


A few of the supplies I have used are retired so use what you have on hand. 


I hope I have helped you to look at paper napkins in a whole different way!

If you need any supplies from Stampin' Up! please reach out and I can help you place an order or help you decide what you need.

If you place a $60 or more order with me I will send you one of these cards! Valid until June 30, 2023.

Happy Stamping and Creating!

Arlene

Product List

Monday, January 31, 2022

Beginner, Casual and Avid Stamper Cards

Beginner, Casual and Avid Stamper Cards

Today I am showcasing how you can use the same stamp set and technique to get three very different looking cards and for all levels of stampers, the beginner, casual and avid stampers. 


This is a great card layout for the new stamper. Or for a "clean and simple" card. 

I started with a card base of Basic White Card Stock, 4 1/4" x 11" and scored at 5 1/2".

Using a Blending Brush and Highland Heather Ink, I applied ink in soft, circular motion to a small area in the center of the card. Then I stamped the large floral image from the Calming Camellia Stamp Set overtop of the ink using Highland Heather Ink. 

I stamped "with sympathy" using Memento Black Ink and the Special Moments Stamp Set onto the bottom right side of the card. It's a simple card but very pretty.


This card is for the casual stamper.

I started with a Highland Heather Card Stock base, 5 1/2" x 8 1/2" and scored at 4 1/4". 

I stamped the large flower from the Calming Camellia Stamp Set directly onto and all over the card base using Highland Heather Ink. If you closely you can see it behind the Basic White layer. It adds a little bit of detail in a very easy way. 


I then cut a piece of Basic White C/S to 4" x 5 1/4". Using the same technique as before, I gently added Highland Heather Ink with my Blending Brush to the center of the layer. Then stamp the floral image from Calming Camellia Stamp Set over top using Highland Heather Ink. Attach this layer to the card base.

On a small scrap of Highland Heather C/S, stamp "with Sympathy" using Memento Black Ink. Attach it to the card using Dimensionals. 

Add a Gorgeous Grape Sheer Ribbon bow and a few Rhinestones to finish off the card. 


This card is more for the Avid stamper, but anyone can do this!!

I started with a card base of Basic White C/S, 5 1/2" x 8 1/2" and scored at 4 1/4". 

Cut a Basic Black C/S layer, 4" x 5 1/4" and set aside.

Cut a Basic White C/S layer, 3 7/8" x 5 7/8". Using the large flower from the Calming Camellia Stamp Set and Highland Heather Ink *stamped off one time (second generation)* stamp the flower 4 times onto this layer. I wanted the softer look so I stamped off one time so the ink was a bit lighter. Then attach this layer to the Basic Black C/S layer and attach them to the card base.

Cut a piece of Basic White C/S to 2 1/2" x 2 1/2". Using the same technique as above, add some Highland Heather Ink with the Blending Brush to the center of this layer. Then stamp the flower overtop using the Highland Heather Ink. *Keep in mind that this layer will be mounted onto the card base in a diamond shape so stamp the flower accordingly. 

Splatter on a bit of Wink Of Stella.

Cut a piece of Basic Black C/S to 2 9/16 x 2 9/16 (or just a smidge larger than the Basic White square) Attach the two layers together. 

Emboss them using the Tasteful Textiles Embossing Folder.

Using Dimensionals, attach them to a Basic White C/S layer measuring 2 5/8" x 2 5/8". Then attach them to the card base in the center and on an angle so it creates a "diamond" shape.

On a small piece of Basic Black C/S, stamp "with Sympathy" in VersaMark Ink and heat emboss using White Embossing Powder and the Heat Tool. Flag cut one end and attach it to the card as shown in the photo. 

Add a double Gorgeous Grape Sheer Ribbon bow just above the sentiment to finish the card. 

I hope you liked today cards and that I have inspired you. 

If you live in Canada and don't already have a demonstrator contact me to purchase any of these products or find out how easy it is to create cards of your own. 

Happy Stamping and Creating!

Arlene


Product List
Paper Snips
[103579]
$13.50