Wednesday, October 28, 2020

Beaded Poinsettia

Beaded Poinsettia

I missed last weeks  Freshly Made Sketches  challenge so I made sure not to miss this weeks! I love this unique layout. Try it for yourself.


Look how vibrant the Poppy Parade Card Stock is!!!
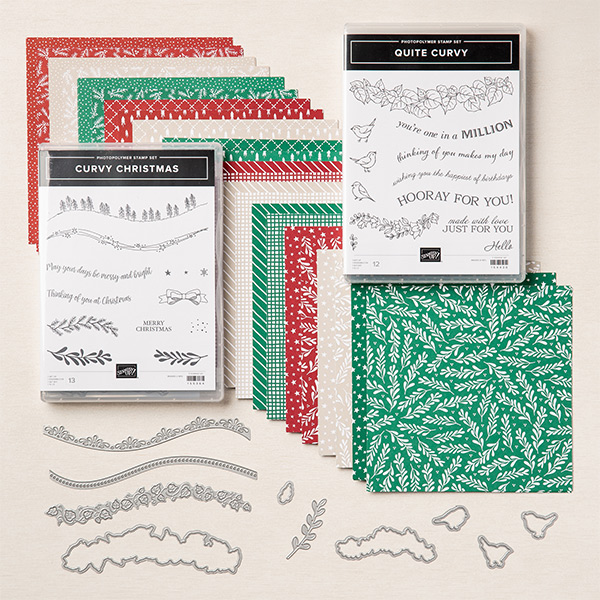
I used the Curvy Christmas Stamp Set. It is being released on November 3! 
The card base is Poppy Parade Card Stock cut to 4 1/4" x 11" scored at 5 1/2". The Whisper White panel is 4" x 5 1/4". I cut 2 triangles from the Flowers For Every Season Designer Series Paper, one is larger than the other. I just played around with these pieces until I liked the sizing. Attach to card front using Multi-Purpose Glue. Stamp the sentiment using Poppy Parade Ink. Die cut 1 medium Poinsettia and 3 mini Poinsettias. Attach to the card front using Dimensionals and Multi-Purpose Liquid Glue. Die cut 2 sprigs in Basic Black C/S using the Poinsettias Dies. Tuck and glue under the Poinsettias. Attach a Beaded pearl using a Glue Dot. Very simple card and soooo many possibilities!!!

Happy Stamping and Creating!
Arlene


Product List

Thursday, October 15, 2020

Curvy Christmas

Curvy Christmas

It's time for another challenge at Freshly Made Sketches.

I decided to use a new bundle called Curvy Celebrations! This bundle will be available on November 3rd!! It's for Christmas and all occasion cards all in one!!158396 QUITE CURVY VARIETY BUNDLE

Here are a few samples from Stampin' Up!

155364 CURVY CHRISTMAS PHOTOPOLYMER STAMP SET

155364 CURVY CHRISTMAS PHOTOPOLYMER STAMP SET

154319 CURVY DIES

154430 QUITE CURVY PHOTOPOLYMER STAMP SET


Here is my card for the Freshly Made Sketch Challenge.


I started with a 5 1/2" x 8 1/2" piece of Cherry Cobbler Card Stock scored at 4 1/4". Cut a piece of Basic Black C/S to 3 1/2" x 4 3/4". Emboss using the Tasteful Textiles Embossing Folder, attach to card  base using Dimensionals. Cut a piece of Classic Christmas Designer Series Paper to 5" x 3", attach to Basic Black layer. Stamp the flourish from the Quite Curvy Stamp Set using Memento Ink onto a scrap of Whisper White C/S. Die cut out using Curvy Dies. Colour using Stampin' Blends. Attach to card front using Multi-Purpose Glue. Cut a piece of Gold Thread from the Forever Greenery Trim Combo, loop a few times and attach using a Glue Dot onto the card front. I like to separate the ends for a wispy look. Stamp sentiment from the Curvy Christmas Stamp Set onto a Whisper White C/S strip using memento Black Ink. These stamps are Photopolymer so I was able to manipulate and "straighten" out the stamp and attach to my acrylic block for a  straight sentiment. Attach to card front using Dimensionals. Using the Curvy Dies, die cut 3 Daffodil Delight leaf sprigs. Tuck under sentiment strip and attach using Multi-Purpose Glue. 

Happy Stamping and Creating!
Arlene


Product List

Friday, October 9, 2020

Wonderful Season

Wonderful Season


I wanted to show you how versatile Stampin' Up!s Designer Series Paper can be.  I chose the gorgeous yellow rose print from the Flowers For Every Season, and turned it into a Christmas card! 


I love this card and how the Basic Black C/S shows off the beauty of the Designer Series Paper! 

I started with a Basic Black card base 11" x 5 1/2" and scored at 3 3/8" from each end to create the tri-fold. To maximize my 6 x 6 piece of DSP I cut the front panel at 3 1/8" x 5 1/4" and the inside flap is the leftover piece cut to 2 7/8" x 5 1/4".


The belly band is Basic Black C/S cut to 1" x 9". Starting at the front of the card, wrap the band around the card ending in the front. Remove, crease score lines for a neater look, then glue the ends together. You don't want to wrap the belly band too tight or it will be difficult to get on and off of the card. 

Die cut a Basic Black C/S Label from the Tasteful Labels Die. Attach to the Belly Band using Dimensionals. This will cover up the seam of the belly band.

Die cut a Whisper White C/S Label using a smaller label from the Tasteful Labels Die. Stamp sentiment in Memento Black Ink from the Poinsettia Petals Stamp Set. Attach to the Basic Black C/S Label using Dimensional's. 

Die cut 2 medium poinsettias using Bumble Bee C/S, 1 Basic Black C/S centre and 2 Basic Black C/S Sprigs. Attach to belly band/labels using Multi-Purpose Glue. 

Using a Dark Daffodil Delight Blend, colour 1 Rhinestone. Add to the center of the poinsettia. Slide belly band onto card.


Happy Stamping and Creating! 

Leave me a comment, I would love to hear from you!

Arlene


Product List 

Saturday, October 3, 2020

World Card Making Day

 Happy World Card Making Day!!

During these uncertain and scary times it's nice to escape into my craft room and make some cards. Today is World Card Making Day!!! I love that we have a day to celebrate designing and creating homemade cards.


Have a wonderful day and I hope you can also make some cards today!


Product List