Friday, May 27, 2022

Retiring List For the January-June 2022 Mini

Retiring List For the January-June 2022 Mini

Sale starts June 1st


It's always sad to say goodbye to a catalogue but the good news is another one is soon to be released on July 1st!

Check out the retiring list below. Lots and lots of the items are discounted!! 

Last Chance List  Sale starts on June 1st, 2022

Shopping in my store here, Last Chance Sale will give you the most up to date product availability and best chance to get some deals! Or contact me and I can help you out. 

 Contact Me Here:

This promotion is only until supplies last. 

Happy Stamping and Creating!

Arlene


Wednesday, May 25, 2022

Blog Hop, Embossed Treat Bags

 Canada Ink's Up! Blog Hop

Thanks for stopping by for another Canada Ink's Up! Blog Hop! 


I had a chance to play around with the new Embossed Treat Bags! I decorated the Embossed Treat Bag and made 2 coordinating cards to go with it. This would make a nice gift for someone.


I started by splattering some Sweet Sorbet Ink onto the front of the bag using a Water Painter. 

Then I die cut the large detailed butterfly from the Brilliant Wings Dies using the new Sweet Sorbet 2022-2024 In-Color Glimmer Paper. I also die cut the solid Butterfly in Basic Black Card Stock. Attach them together using Dimensionals. Then attach them to the bag front with more Dimensionals.

Add some Rhinestones and a Glittered Organdy Ribbon bow to the bag handle.


For this card I started with a 4 1/4" X 11" piece of Sweet Sorbet C/S scored at 5 1/2".

Cut a piece of Basic Black C/S to 4" x 5 1/4" and a piece of Basic White C/S to 3 3/4" x 5".

Lay the Butterfly Brilliance Background Stamp onto your work surface, facing up. Ink the stamp well using the Sweet Sorbet Ink Pad. Lay the Basic White C/S panel onto the inked stamp, using a scrap piece of paper, lay it overtop and gently rub to transfer the ink to the card stock. Lift off gently so you don't smear the ink.

Attach the Basic White and Basic Black C/S layers together using Multi-Purpose Liquid Glue then emboss using the Timeworn Type 3D Embossing Folder. 

Wrap the Glittered Organdy Ribbon around the card and tie into a bow on the far left side of the card. Make sure it is well over so the panel will fit.

Attach the embossed panel to the card front.

Die cut a detailed butterfly using the Brilliant Wings Dies and the Gold and Rose Gold Metallic Specialty Paper. I used the Rose Gold for this card. Line up the die cut butterfly with the large stamped butterfly image and attach using Dimensionals.

I left off a sentiment so this card could be used for anything.


The 2nd card uses the Sweet Sorbet C/S again for the card base, 4 1/4" X 11" and scored at 5 1/2".

Cut a Basic White C/S layer, 4" x 5 1/4". Stamp the butterflies again using the same technique as above.

Use the Water Painter to splatter some Sweet Sorbet Ink onto the layer. Once dry attach it to the card front using Multi-Purpose Liquid Glue. Sprinkle on some Wink Of Stella if you like lots of sparkle!

Die cut 1 detailed butterfly and 2 little butterflies using the Gold and Rose Gold Metallic Specialty Paper, I used the Gold this time. Lining up the big stamped butterfly with the die cut attach them using Dimensionals.


Stamp the sentiment onto a Basic White C/S scrap using Memento Black Ink and the Go To Greetings Stamp Set. Flag cut the end. Attach it to a slightly larger piece of Sweet Sorbet C/S and flag cut that end. Attach it to the card front using Dimensionals.

Tie a triple bow using the Sweet Sorbet In-Color Bakers Twine Pack. Attach above the sentiment using a Glue Dot.


Be sure to hop around and see all the talent our team has!

Blog Roll


Happy Stamping and Creating!
Arlene

Shop with me HERE.


Product List

Paper Snips
[103579]
$15.00

Friday, May 20, 2022

Gift Bag With Coordinating Set Of Cards

 Gift Bag With Coordinating Set Of Cards

I will be participating in my first Craft Fair this Winter at my local Mall, Tsawwassen Mills in Delta B.C. I'm so excited and have been very busy crafting away! It is a 4 day event so I will need lots of inventory! 

I saw this adorable and easy gift bag on The Paper Pixie blog and I knew it would be perfect for the Craft Fair! Check out Julies Blog for all the details and assembly instructions. Thanks Julie for inspiring me!

I used the beautiful Sun Prints Designer Series Paper for the gift bag. 

I added some Gold Glimmer butterflies to the front and a white ribbon for the handles. The Gold and Rose Gold Specialty Paper or Gold Foil would also be perfect for the butterflies!

For this card I started with a 5 1/2" X 8 1/2" piece of Night Of Navy Card Stock scored at 4 1/4". 

I used the Butterfly Brilliance Stamp Set and Night Of Navy Ink to add the butterflies to the card front. This stamp is a large background stamp. *Tip: After you ink up the stamp, lay it down on your work surface, ink side up, and lay your card stock over the inked stamp, use a piece of scrap paper to gently rub the stamp to transfer the ink to the C/S. It's much easier than lifting up the stamp.

I then stamped the sentiment onto a piece of Basic White C/S, flag cut one end and attach it to the card base using Dimensionals. Add a Gold butterfly for a great pop of sparkle!

This card starts with a Basic White C/S base, 4 1/4" X 11" scored at 5 1/2". 

Cut a piece of the Sun Prints Designer Series Paper to 3 3/4" X 5" and emboss using the new Cascading Ruffles Embossing Folder. This is an easy way to add texture to a card. Attach it to the card front using Multi-Purpose Liquid Glue.

Add a sentiment and a few gold butterflies. Quick and easy but very elegant.


Again I stamped the card front with the Butterfly Brilliance Stamp and Night Of Navy Ink.

Die cut a Basic White C/S tag using the Tailor Made Tags Dies and stamp a sentiment using Night Of Navy Ink. 

Add a White Bakers Twine triple bow and a small gold butterfly to the tag. Attach the tag to the card front using Dimensionals. 

Again I stamped the butterflies onto the card front using Night Of Navy Ink and the Butterfly Brilliance Stamp.

Die cut a 2 1/2" Basic White C/S circle. 

Stamp some butterflies onto the circle using Balmy Blue Ink and the Butterfly Brilliance Stamp Set. Attach the circle to the card front using Dimensionals. 

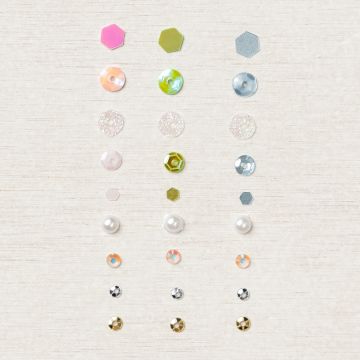
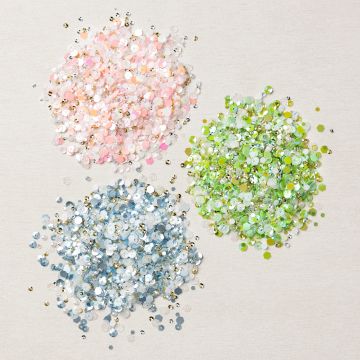
Add a die cut gold butterfly to the circle and some gorgeous "For Everything Fancy Sequins". Did you see these sequins in the 2022-2023 Annual Catalogue? They are on page 141. They are amazing! They will last forever and have so many different bits and pieces! They come in 3 different tubs for simple storage.

FOR EVERYTHING FANCY SEQUINS

FOR EVERYTHING FANCY SEQUINS

This bag will hold up to 6 cards with matching envelopes.


I hope I have inspired you today with my projects.

Happy Stamping and Creating!

Arlene

Live in Canada? Shop HERE with me. 

Join my team HERE. Check out this awesome deal on the Stampin' Up Starter Kit!


Product List For Todays Projects

Paper Snips
[103579]
$15.00