Christmas Fractured Card
I really enjoy making these "Fractured" cards. I find them very interesting to look at and they are super easy!! That's my kind of card!
I used the beautiful Sophisticated Sled Bundle for todays cards and the Season Of Gold And Green Designer Series Paper. These are both On-Line Exclusive products and not in any Catalogue.

SEASON OF GREEN & GOLD 12" X 12" (30.5 X 30.5 CM) SPECIALTY DESIGNER SERIES PAPER
$23.00

SOPHISTICATED SLED BUNDLE (ENGLISH)
$72.75
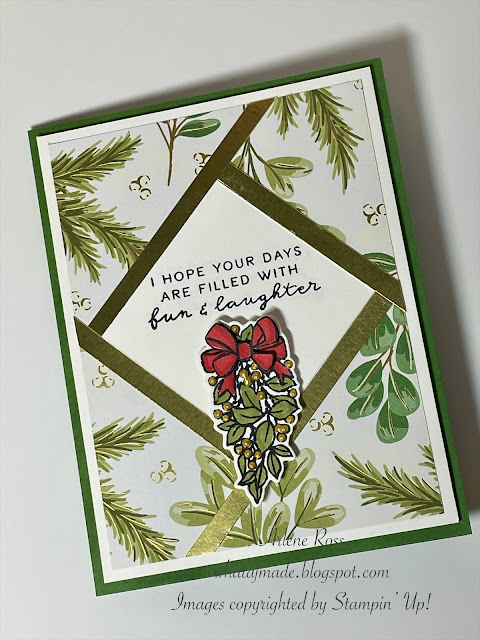
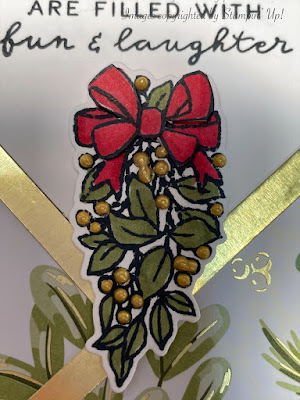
I love the "pop" of red!

Cutting Guide
Cut Garden Green Card Stock 4 1/4" x 11" score at 5 1/2", this is the card base. I also cut one of the bases at 5 1/2" x 8 1/2" and scored at 4 1/4". Either works great! Set aside.
Cut Basic White C/S: 4" x 5 1/4" and another piece @ 2 1/4" x 2 1/4".
Cut 4 strips of Gold Glimmer or Gold Foil Paper 1/4" x 6".
Cut the Season Of Green And Gold Designer Series Paper to 3 3/4" x 5".
Directions
Stamp your sentiment using Memento Black Ink onto the 2 1/4" x 2 1/4" Basic White C/S piece, turn it so it becomes a diamond shape. Stamp the sentiment more towards the top of the diamond.
Also stamp the bough from the Sophisticated Sled Stamp Set using Memento Black Ink onto a scrap of Basic White C/S and die cut with the co-ordinating die set. Stamp another bough just were the ribbon is and fussy cut it out.

Attach the sentiment to the center of the DSP in a diamond shape.

Take the first strip, add a little bit of Multi-Purpose Liquid Glue to it and lay it tight up to the Basic White C/S sentiment on the bottom right side and even with the edge of the square. It will go off the DSP and hang over. *See photos.

Next, add another strip tight up against the sentiment piece and butting up to the first strip, again it will go off the edge of the paper.

Continue with strip 3 and 4.


Attach this DSP layer to the Basic White C/S layer then attach it to the card base using Dimensionals.
Colour the bough and the ribbons using Mossy Meadow, Real Red and Pecan Pie Stampin' Blends. One of the bows I did in Real Red Blends the other was done in Pecan Pie Blends.


Attach the bough to the card front using Dimensionals.
Add tiny dots of the Gold Metallic Enamel Effects to all the berries on the bough. Set aside to dry.
Card Inside
I stamped a Memento Black Ink wreath onto a 3 3/4" x 5" piece of Basic White C/S.
I coloured it with Mossy Meadow Stampin' Blends and also used the Gold Enamel Effects on the berries. Leave the card open until it dries.


Don't forget to decorate your envelopes!

I hope you have enjoyed todays fun fold card and have some time to create one for yourself!
Stampin' Up! is having a huge sale on select Designer Series Papers! 15% off!

The gorgeous Winter Meadow DSP is one of the ones on sale!!

WINTER MEADOW 12" X 12" (30.5 X 30.5 CM) DESIGNER SERIES PAPER #162133
 |  | ||
 |  Gold Glimmer Paper [146958] $6.75 |  | |
 | |||
 |  |  |  |
")
 Specialty Designer Series Paper")


Beautiful card Arlene. Your instructions are so detailed and easy to understand and the addition of the photos is very helpful. TFS
ReplyDeleteThank you so much Sue!!
Delete