Fun Floral Card And A New Catalogue!!
It's an exciting day!! The New September-December 2023 Mini Catalogue goes live today!!

Starting September 6th, 2023 you can go to my On-Line Store to see this catalogue. ↘💜
I am still out of town for another day or two so as soon as I am back I will add the link for the new catalogue!
After you have checked out todays card and my photos, at the end of my Blog is some great videos from Stampin' Up! showing some of the new products!
Now, onto todays card.

I have used the Darling Details Bundle to design todays card. Check out all those amazing dies that come with this bundle! I also love the font and the sentiments with this set!

Directions:
I started with a card base of Calypso Coral Card Stock cut to 4 1/4" x 11" and scored at 5 1/2".
Cut a 2 5/8" x 4" piece of Basic White C/S. Using Calypso Coral Ink full strength, randomly stamp the large flower outlines. Stamp the insides of the flowers using 2nd generation Calypso Coral Ink. *Tip: ink up the stamp, stamp off once onto scrap paper, then stamp onto your art panel for a softer look.
Attach this layer to the card base using Multi-Purpose Liquid Glue.
Cut a piece of Basic White C/S to 4" x 5 1/4" and die cut the larger of the decorative frames. Using Dimensionals, attach the frame overtop of the art panel and to the card base.
Stamp and die cut more of the flowers, all the different sizes using Calypso Coral Ink. Use the same stamping technique as described above.
Stamp and die cut some leaves using Garden Green Ink full strength and second generation.
I crumbled up some of the flowers in my hand for a bit more dimension. Attach the flowers using Dimensionals and then tuck the leaves underneath and use a bit of Multi-Purpose Liquid Glue to attach them.
Stamp the sentiment from Go To Greetings in Memento Black Ink onto a scrap of Basic White C/S. Attach it to the card base using Dimensionals.
Add a double Linen Thread Bow attaching with a Glue Dot.


For the inside I cut a 3 1/2" x 5" piece of Basic White C/S and I stamped a few Calypso Coral flowers. I also did the same to my envelope.
More from beautiful Sointula B.C.


I love all my beach treasures!

My parents over the last 22 years of living in Sointula have rescued and spayed or neuter over 20 cats. Some of them become friendly others not so much. They feed them all, provide shelter and safety. Some of them even decide that they like to live in the house. Some just can't bring themselves to go inside. It's always their choice. This is a photo of Ginger and Hissy. Ginger is very friendly and loving and Hissy.....well, he's not so friendly. When you give him his bowl of food, he hisses at you! Not very polite! LOL


This is one of the local gift shops!

You can't see me!!!! Yes we can!!


This way to the beach!!


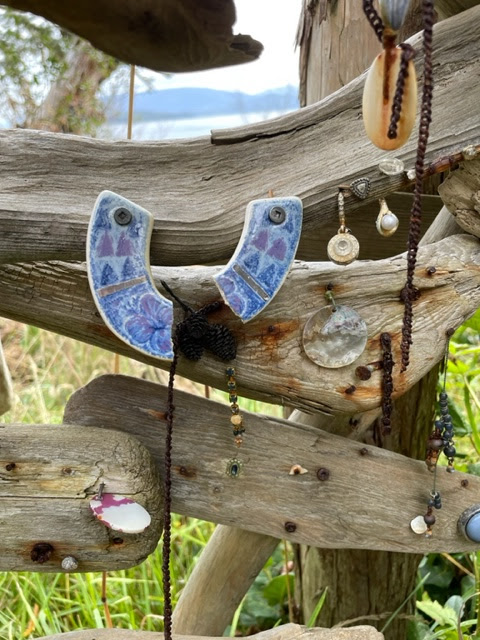
Look at this beauty! Someone made this piece of art from driftwood and everyone that comes by leaves a little memento behind.


This is Coho Joes Cafe. They have amazing food and beverages!
Another great place for yummies is Malcolm Island Food Company. Try their Hello Dolly Bars!! 😋

The wood shed is covered in Virginia Creeper. It has beautiful green leaves all Spring and Summer then in the Fall it transforms into this amazing display of reds, oranges and burgundies.

A Stellar Jay hoping for some cat food!

Can you spot the cute Douglas squirrel?


She is a Columbia Black Tail Deer. 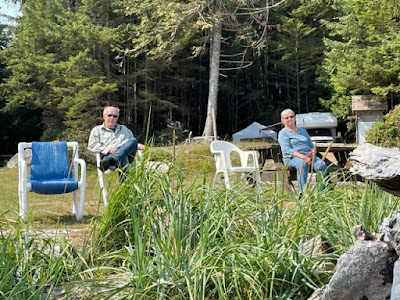
My awesomely wonderful Mom and Dad. 💕
Bundle up and Save!
New Designer Series Paper!!
Them Bones Suite!
Joy Of Christmas Suite. So pretty!!
Product List

My awesomely wonderful Mom and Dad. 💕
Relaxing at Bere Point hoping to see a whale.
We did!!!
**Check out the following videos from Stampin' Up! showcasing just a few products from the new catalogue!**
Bundle up and Save!
New Designer Series Paper!!
Them Bones Suite!
Joy Of Christmas Suite. So pretty!!
Thanks for stopping by today to see my card and some beautiful photos.
Happy Stamping and Creating!!
Arlene
 |  | ||
 |  |  |  |
 |  |  |  |
 |  |
")


")
 Glimmer Paper")

 Frayed Ribbon")


