Tuesday, November 7, 2023

Stars At Night Card

 Stars At Night Card

The Night Of Navy Card Stock, Night Of Navy & Gold Glittered Ribbon and Gold Adhesive Backed Star Trinkets make this card so beautiful! It is a very simple layout that can be used over and over. Change up the colours and the Designer Series Paper and every card will be so different and amazing!

Directions:

Cut a piece of Night Of Navy Card Stock to 5 1/2" x 8 1/2" and score at 4 1/4".

Using Night Of Navy Ink, stamp the card front with the  "fireworks burst stamp".

Cut a 5 1/2" x 1 3/4" piece of the One Horse Open Sleigh Designer Series Paper. I used a piece that was very light. Then cut a piece of the DSP at 5 1/2" x 1" that is darker. Attach them together then attach them to the card front. 

Cut another piece of the lighter DSP to 4 1/2" x 3/8" and stamp the sentiment using Night Of Navy Ink. Flag cut one end. Set aside.

Punch or die cut out a large circle from Basic White C/S. 

Using Misty Moonlight Ink, stamp the "starburst" onto the Basic White C/S circle.

Cut a piece of the Night Of Navy & Gold Glittered Ribbon, fold it in half and attach it behind the circle. Attach the circle to the card front using Dimensionals.

Attach the sentiment strip to the card front. *Tip: Use Multi-Purpose Liquid Glue for the portion of the strip that will attach to the circle and Mini Dimensionals for the rest. 

Add some of the Adhesive Backed Star Trinkets to finish off the card front. 


I didn't do it but a nice splatter of Wink Of Stella would be really pretty too!

For the inside I cut a piece of Basic White C/S to 5" x 3 3/4" and I stamped the same "starburst" using second generation Misty Moonlight Ink. *Tip: for a softer look and to utilize your stamp pads to the fullest, ink up a stamp, stamp off on scrap paper, then stamp onto your project. This gives you a lighter tone. Stamping off 1X is second generation, stamping off 2x's is third generation. Have fun playing around to see all the different looks you can achieve. 

The complete supply list is below. Click on any of the photos and you will be directed to my store where you can purchase these supplies. 

Thanks so much for stopping by Blog. Leave me a comment! I love hearing from you. 🙋

Happy Stamping and Creating!

Arlene


Product List

Paper Snips
[103579]
$15.00

NEW On-line Products Available!

 New On-Line Products Now Available!

I love that Stampin' Up! is adding all these great On-Line Products! It's always exciting when something NEW is released! 


Here are some new On-Line Exclusive Products! These products will not appear in any of our catalogues. Simply click on any of the photos and you will be automatically taken to that product in my on-line store. 

Or click on the link below to go to my On-line Store where you can shop for everything!

Timeless Charm Cling Stamp Set (English)
[162256]
$35.00

Happy Stamping and Creating!
Arlene

Sunday, October 22, 2023

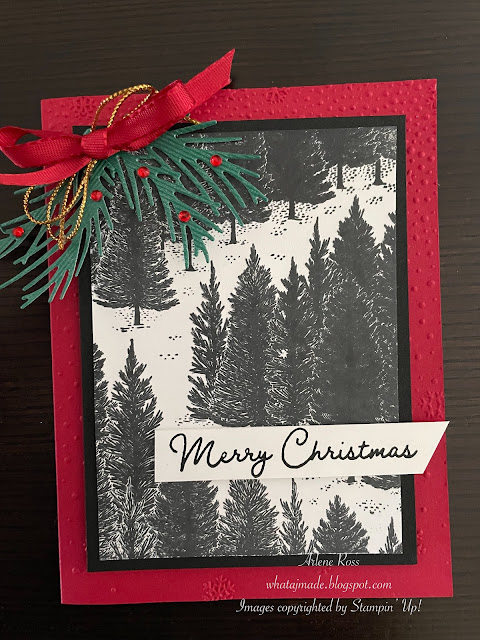
Fragrant Forest Christmas Card


Fragrant Forest Christmas Card

I just love how this card came together. The black, red and white are so striking together.

 This was one of the cards we made at my Card Club/Class this weekend. We meet once a month, I design, prepare and supply everything to make the cards.


After I finished designing this card I decided to change it up a little. Here is version 2.


Then I decided to add a sentiment strip to the card front.


Which one do you like better?
                                                                                                           
                                                                
Directions:  Cut a piece of Real Red Card Stock to 8 1/2" x 5 1/2" and score at 4 1/4".

Emboss the front using the Snowflake Sky 3D Embossing Folder from Stampin' Up!

Stamp the trees from the Fragrant Forest Stamp Set using Memento Black Ink onto a piece of 3 1/4" x 4 1/2" Basic White C/S. *Tip: I used a Misti Stamp Positioner so I could ink up and stamp the trees a few times so they would be very dark. 

Attach this layer to a 4 3/4" x 3 1/2" piece of Basic Black C/S.

Attach these layers to the card front using Dimensionals.

I sprayed the card front at this point with a mixture of rubbing alcohol and some shimmer paint or a few drops from a Wink Of Stella Brush to add some soft sparkle. Tip *Using a spray bottle with a fine mist, add a few drop of a sparkly paint, add some rubbing alcohol and spray your project then dry with a Heat Tool.


You can see the fine shimmer here.

Die cut 2 boughs from the Noel Dies using either the White or Green from the Textured 12 x 12 Shimmer Paper.

Attach the boughs to the card using Glue Dots.

Cut a piece of Gold or Silver Cord from the Simply Elegant Trim. Loop the cord back and forth a few time, use Glue Dots to hold it and attach it to the top of the boughs with more Glue Dots.

Attach a bow over top of the looped cord using Glue Dots. One of the card uses the Black And White Gingham Ribbon and the other uses the Real Red Ribbon. I tried to off-set it slightly from the cord. 


Color some Rhinestones with a red sharpie marker and attach to the boughs. 


Card Inside:  For the card inside, cut a 3 1/2" x 5" piece of Basic White C/S.

Using the "Noel" Die from the Joy Of Noel Bundle, die cut the word "Noel" out from the above layer. Use something like Washi Tape or Post-It-Note Tape to center the die so it doesn't move. Be sure to keep the center of the "O". Glue this layer inside of the card, add the inside of the "O". Now the Real Red Card Stock will show through! Super easy way to make the inside of the card impressive!!


I hope you have enjoyed todays cards and the variations. Hopefully I have inspired you 💜

Happy Stamping and Creating!
Arlene

Here is the list of products that I have used to make todays cards. If you need anything and live in Canada here is my link to shop in my store. 

Thanks so much! 

Product List
Paper Snips
[103579]
$15.00

Friday, October 6, 2023

FREE Shipping October 9-11


FREE Shipping!!


It's a great time to order those Christmas Sets, Dies and Papers that you need for all your holiday cards!! Free shipping on orders of $100.00 or more! Need just a few things? Ask your friends if they need anything and go in together and save!

Think of all the supplies that you regularly use, adhesives, card stocks, ribbons, embellishments and envelopes. Instead of ordering a few here and there, order them during free shipping and then you have stock when you need it and you saved some money!

Don't wait too long, it's only October 9-11.

Shop HERE on October 9th - 11th

If your order is over $200.00 before taxes you will also earn Host Rewards! Contact me and I can help you get the rewards!

Happy Stamping and Creating!

Arlene