Showing posts with label Dainty Delight Stamp Set. Show all posts

Monday, May 29, 2023

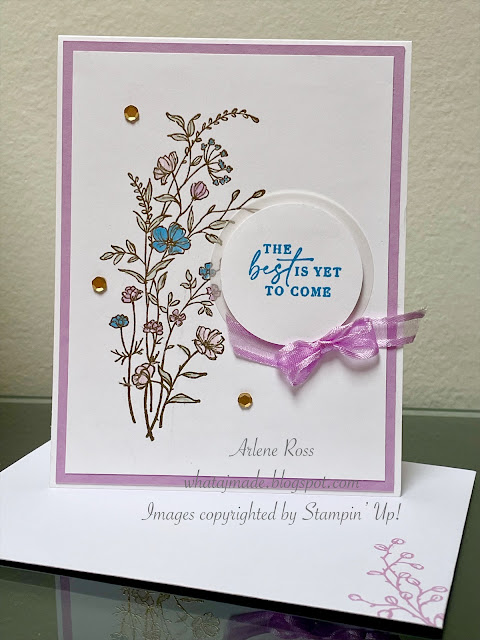
The Best Is Yet To Come!

 The Best Is Yet To Come!

This is another card I taught at the beginners card class. It's always so impressive to see the magic of heat embossing!


Directions:

Cut a piece of Thick Basic White Card Stock to 4 1/4" x 11" and score at 5 1/2".

Cut a piece of Fresh Freesia C/S to 4 1/8" x 5 3/8" and attach it to the card base.

Cut a piece of Basic White C/S to 3 7/8" x 5 1/8". Stamp the floral image using VersaMark Ink, sprinkle Gold Embossing Powder over the image, tap off and heat set.

Using Stampin' Blends, colour in the flowers and leaves. I used: Light Soft Sea Foam, Light Fresh Freesia and Light Azure Afternoon. I wanted the colours to be soft and light.

Attach this layer to the card base.

Using Azure Afternoon Ink, stamp the sentiment onto Basic White C/S. Punch out using the 1 3/4" Punch or Stylish Shapes Dies.

I just love this sentiment! Such a positive message!

Punch out a 2" Vellum C/S circle or die cut the circle with Stylish Shapes.

Attach the sentiment to the Vellum circle using Dimensionals. Then attach it to the card front.

Attach a ribbon bow using a Glue Dot and add some Gold Sequins to finish off the card. I used Fresh Freesia Ribbon but it has retired so any ribbon you have would be great. 

Don't forget to stamp your envelope and inside of the card!

Thanks for stopping by today!

Happy Stamping and Creating!

Arlene

To order any of the products I have used today just click on the image and you will be directed to my on-line store. I appreciate all orders. Thank you!

If your order is $60.00 or more I will send you this card!! Or this card: You choose!

Product List

Paper Snips
[103579]
$15.00

Saturday, April 8, 2023

(New Post) Fun Fold And Happy Easter!

 Fun Fold Card And Happy Easter!


Lola and I would like to wish everyone, two legged and four legged a very Happy Easter! 

Todays card is a super easy fun fold! I used Designer Series Paper so that both sides of our beautiful papers can be seen!

Directions:

Cut a piece of Designer Series Paper to 5 1/2" x 11".

Score with the long side at the top at 1 /34", 3 1/2", 5 1/4" and 7". Fold and score as seen in the photo.

The small folding insert is Designer Series Paper cut to 3" x 6" and scored at 3".

Attach the small insert by adding adhesive to the left side only and attaching it to the front as shown in the photo. Then close up the card folds and glue the other side of the insert to the inside folds, adding glue to only the right side.


Cut a 2 3/4" x 2 3/4" piece of Basic White Card Stock and stamp the floral image in Memento Black Ink. Color in with Stampin' Blends. Stamp the sentiment using Pool Party Ink. Attach this panel using Dimensionals to the front of the insert.

For the inside I cut a 3 3/4" x 5 1/4" piece of basic White C/S. 

That's all.....pretty simple, right!


 Thanks so much for stopping by today!

Happy Stamping and Creating!

Arlene

Product List

Friday, February 17, 2023

(New Post) Easy Belly Band Card

 Belly Band Card with Dainty Flowers Designer Series Paper


I made this very simple card fold with a belly band using the gorgeous Dainty Flowers Designer Series Paper. This paper is one of the free offering from Stampin' Up! during Sale-a-bration 2023! Our Sale-A-Bration promotion is over on February 28, 2023. You don't want to miss out on earning FREE products!! 

Shop here with me. I appreciate all orders. 


Directions for todays card:

I started with a 5 1/2" x 8 1/2" piece of Starry Sky Card Stock for the card base. Score at 1 1/2" and 5 3/4". This makes a bit of a different fold for the base. 

Cut some Pool Party Card Stock to 1 1/4" x 5 1/4" and another piece at 2 1/2" x 5 1/4". Attach these layers to the card base.

Cut the Dainty Flowers DSP to 1" x 5" and 2 1/4" x 5". Attach to the Pool Party layers. *Tip: when cutting the DSP make sure your pattern is running in the correct position. We don't want sideways flowers! Been there and done that! lol


Cut a piece of Pool Party C/S to 1" x 9 1/4". Wrap around the card base, not too tight, starting and ending in the front. I do this so that the seam will be covered. Once you have wrapped the belly band around the card, remove it and burnish the score lines well. Wrap around again and glue the end of the band to form the belly band. Make sure not to get glue on the card base. You want the belly band to be easily slipped off and on.


Cut a piece of the Textured Shimmer Paper to 4 1/4" x 7/8" and attach to the front of the belly band. This paper adds such a nice sparkle and texture!!

Die cut a tag from the Sentimental Park Dies in Basic White C/S. These tags are so intricate and dainty!

Stamp the flowers onto the tag using the floral image from the Sentimental Park Stamp Set. I used 2nd generation Pool Party Ink to stamp the flowers. What does second generation mean? It means I inked up the stamp with the Pool Party Ink, then I stamp off one time onto scrap paper, then stamp onto the label. This creates a lighter ink tone. 


Stamp the sentiment in Memento Black Ink using the Dainty Delight Stamp Set over top of the flowers.

Attach the label to the belly band using Dimensionals.

Die cut some tiny flowers from the Sentimental Dies using Starry Sky C/S. I used 1 big flower and 2 small flowers. Attach them to the label on the bottom left using tiny dots of Multi-Purpose Liquid Glue. 

Add some Rhinestones to the flowers.

For the inside I cut a piece of Basic White C/S to 4" x 5 1/4" and I stamped a floral image from the Dainty Delight Stamp Set using Starry Sky Ink. 


Give this card style a try for yourself!                                     
Happy Stamping and Creating! 

Arlene                                   


Product List

Paper Snips
[103579]
$15.00