Showing posts with label Pool Party Card Stock. Show all posts

Friday, February 17, 2023

(New Post) Easy Belly Band Card

 Belly Band Card with Dainty Flowers Designer Series Paper


I made this very simple card fold with a belly band using the gorgeous Dainty Flowers Designer Series Paper. This paper is one of the free offering from Stampin' Up! during Sale-a-bration 2023! Our Sale-A-Bration promotion is over on February 28, 2023. You don't want to miss out on earning FREE products!! 

Shop here with me. I appreciate all orders. 


Directions for todays card:

I started with a 5 1/2" x 8 1/2" piece of Starry Sky Card Stock for the card base. Score at 1 1/2" and 5 3/4". This makes a bit of a different fold for the base. 

Cut some Pool Party Card Stock to 1 1/4" x 5 1/4" and another piece at 2 1/2" x 5 1/4". Attach these layers to the card base.

Cut the Dainty Flowers DSP to 1" x 5" and 2 1/4" x 5". Attach to the Pool Party layers. *Tip: when cutting the DSP make sure your pattern is running in the correct position. We don't want sideways flowers! Been there and done that! lol


Cut a piece of Pool Party C/S to 1" x 9 1/4". Wrap around the card base, not too tight, starting and ending in the front. I do this so that the seam will be covered. Once you have wrapped the belly band around the card, remove it and burnish the score lines well. Wrap around again and glue the end of the band to form the belly band. Make sure not to get glue on the card base. You want the belly band to be easily slipped off and on.


Cut a piece of the Textured Shimmer Paper to 4 1/4" x 7/8" and attach to the front of the belly band. This paper adds such a nice sparkle and texture!!

Die cut a tag from the Sentimental Park Dies in Basic White C/S. These tags are so intricate and dainty!

Stamp the flowers onto the tag using the floral image from the Sentimental Park Stamp Set. I used 2nd generation Pool Party Ink to stamp the flowers. What does second generation mean? It means I inked up the stamp with the Pool Party Ink, then I stamp off one time onto scrap paper, then stamp onto the label. This creates a lighter ink tone. 


Stamp the sentiment in Memento Black Ink using the Dainty Delight Stamp Set over top of the flowers.

Attach the label to the belly band using Dimensionals.

Die cut some tiny flowers from the Sentimental Dies using Starry Sky C/S. I used 1 big flower and 2 small flowers. Attach them to the label on the bottom left using tiny dots of Multi-Purpose Liquid Glue. 

Add some Rhinestones to the flowers.

For the inside I cut a piece of Basic White C/S to 4" x 5 1/4" and I stamped a floral image from the Dainty Delight Stamp Set using Starry Sky Ink. 


Give this card style a try for yourself!                                     
Happy Stamping and Creating! 

Arlene                                   


Product List

Paper Snips
[103579]
$15.00

Saturday, January 22, 2022

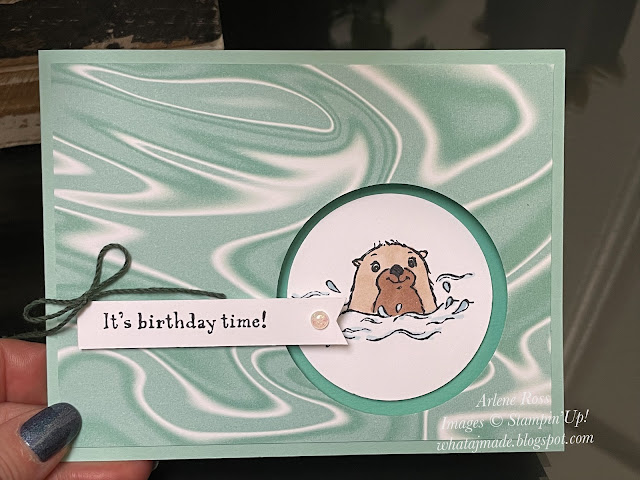
Awesome Otters

 Awesome Otters!

These little Otters are soooo cute!! I am quite partial to any furry critters 😁

      Awesome Otters Stamp Set


This is a stamp set that you can earn for FREE during Sale-A-Bration 2022. Check out the SAB Catalogue on the right hand side of my Blog "Web Version". The Designer Series Paper, "Simply Marbleous", is also a FREE SAB item! I thought it looked like gentle waves, a perfect background for a Sea Otter.


I used two different colour layouts. One is Balmy Blue Card Stock and Soft Sea Foam C/S and the other is Coastal Cabana C/S and Pool Party C/S.

I started with a card base, 4 1/4" x 11" and scored at 5 1/2". 

Cut a piece of Simply Marbleous Designer Series Paper to 4" x 5 1/4". Attach to the card base, adding glue around the edges only. 

Attach the coordinating coloured card stock, cut to 5 1/4" x 4", to the inside of the card. 

Using the Layering Circles Dies, cut out a circle from the card front on the right hand side. If you haven't added glue all over the DSP you will get a circle of C/S and DSP that you can re-use. My circle opening is approx. 2 1/2".

Die cut a Basic White C/S circle that is smaller than the opening, mine is approx. 2". 

Stamp the Otter using Memento Black Ink onto the Basic White C/S circle. Colour using Stampin' Blends. I used Basic Black on his nose, Ivory on the body, Bronze on his chest and Light and Dark Balmy Blue on the water. I splattered on some Wink Of Stella as well for some sparkle!

Attach this circle to the inside of the card so it shows through the circle opening. I used Dimensionals to attach it. 

Stamp the inside sentiment using Memento Black Ink.

Using a strip of Basic White C/S and Memento Black Ink, stamp "It's Birthday Time!" Flag cut one end. Attach to the card front using Dimensionals. Add an Opal Round Embellishment and a Fan Bakers Twine bow to finish it off.

I hope you find todays card fun!

Happy Stamping and Creating!

Arlene

Product List
Opal Rounds
[154289]
$10.25

Thursday, January 20, 2022

Birthday Card For A Cat Lover

 Birthday Card For A Cat Lover

I needed a birthday card for a cat lover so I brought out the Cat Punch and some of the Sunshine And Rainbows Designer Series Paper and came up with this!


Directions:
Card Base, cut a piece of Pool Party Card Stock to 4 1/4" x 11" and score at 5 1/2".

Cut a layer of Basic Black C/S to 4 1/8" x 5 3/8" and attach to the card base.

Cut a piece of the Sunshine And Rainbows Designer Series Paper to 4" x 5 1/4" and attach to the Basic Black layer. The Sunshine And Rainbows DSP is a Sale-A-Bration item that you can earn for free! Check it out here: Shop with me

Cut a piece of Basic White C/S to 3 1/2" x 4 3/4". Stamp Happy Birthday using Memento Black Ink and the Happy Birthday from the Flowing Flowers Stamp Set onto the upper left side. Punch out the cat using the Cat Punch onto the bottom right. Emboss this layer using the Timeworn Type Embossing Folder. Attach it to the card base using Dimensionals. 

Add a beautiful pearl collar using the smallest Pearl Basic Jewels and 3 more assorted sized pearls on the upper left.

Thank you for joining me today!

Happy Stamping and Creating!
Arlene