Showing posts with label Textured Shimmer Paper. Show all posts

Sunday, May 7, 2023

(New Post) Platform Pop-Up Hexagon Card

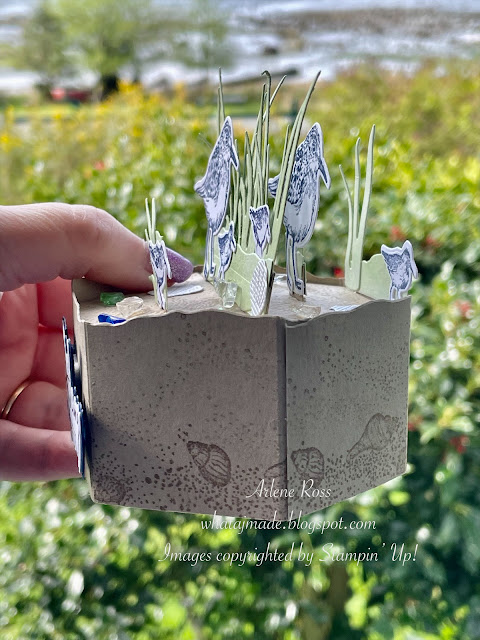
 Platform Pop-up Hexagon Card

This was a really fun card to make. I saw this amazing blog post from Kim and she has a very detailed tutorial for this fun fold! 

See her post here: Horsin' Around Stamping. 

Here is my card. I'm giving it to my Mom for Mother's Day. 

I took these photos at my parents home in Sointula B.C. It makes such a beautiful background for photos.


I stamped the sand and shells in Crumb Cake Ink on Crumb Cake card Stock. The birds are stamped in Night Of Navy Ink onto Basic White Card Stock. The grasses are Soft Sea Foam Card Stock. The shells were die cut using the White Textured Shimmer Paper. I love the shimmer of this paper, just like a real shell!

This fun fold card folds flat and fits easily into an A2 envelope. 


That beautiful Sea Glass (Beach Glass) is some of what I have found on the beaches in Sointula! Beach combing is one of our favorite activities to do while visiting Sointula! 


Here are some more pics from beautiful Sointula.


I hope you find some time soon to check out Kims Tutorial and make one of these cards for yourself! 

Happy Stamping and Creating!

Arlene


Product List
Paper Snips
[103579]
$15.00

Wednesday, April 26, 2023

(New Post) Sneak Peek Timeless Arrangements

Timeless Arrangements Card

Hello and welcome to my Blog! I'm having lots of fun playing with some new products that will be released on May 2, 2023 in the new Stampin' Up! 2023-2024 Annual Catalogue. One of the products is the Timeless Arrangements Bundle. This stamp set has 26 stamps and 16 matching dies! My favorite thing about this set is it has soooo many sentiments! I can't show you the set yet, but I can show you a card I made!


I also used the Pretty Prints Designer Series Paper. Currently it is on the retiring list and on sale for $11.55!! Great deal!!

🛍 Shop here. Thank you!

Directions:

Cut a Thick Basic White Card Stock base to 5 1/2" x 8 1/2" and score at 4 1/4".

Die cut a large Basic White C/S rectangle using the Scalloped Contours Die. Cut a 3 1/4" x 4 1/2" piece of the Pretty Prints DSP and attach it to the rectangle using Multi-Purpose Liquid Glue. Attach this to the card base using Dimensionals. 

Add some adhesive to the center of the DSP and loop some of the Silver Cord back and forth. The adhesive should hold it into place. I use the Stampin' Seal or Tear And Tape. 

Die cut a Basic White C/S rectangle from the Timeless Arrangements Dies. Stamp the sentiment using Blackberry Bliss Ink.


Die cut some floral pieces using the Textured Shimmer Paper. Attach the rectangle sentiment piece over top of the floral pieces and attach over top of the Silver Cord using Dimensionals. 

Add some Metallic Pearls to finish it off.

For the inside I stamped a Blackberry Bliss flower and added a thin strip of the Pretty Prints DSP. I also stamped onto an envelope.


I hope you have enjoyed todays card!

Happy Stamping and Creating!

Arlene

Product List

Friday, February 17, 2023

(New Post) Easy Belly Band Card

 Belly Band Card with Dainty Flowers Designer Series Paper


I made this very simple card fold with a belly band using the gorgeous Dainty Flowers Designer Series Paper. This paper is one of the free offering from Stampin' Up! during Sale-a-bration 2023! Our Sale-A-Bration promotion is over on February 28, 2023. You don't want to miss out on earning FREE products!! 

Shop here with me. I appreciate all orders. 


Directions for todays card:

I started with a 5 1/2" x 8 1/2" piece of Starry Sky Card Stock for the card base. Score at 1 1/2" and 5 3/4". This makes a bit of a different fold for the base. 

Cut some Pool Party Card Stock to 1 1/4" x 5 1/4" and another piece at 2 1/2" x 5 1/4". Attach these layers to the card base.

Cut the Dainty Flowers DSP to 1" x 5" and 2 1/4" x 5". Attach to the Pool Party layers. *Tip: when cutting the DSP make sure your pattern is running in the correct position. We don't want sideways flowers! Been there and done that! lol


Cut a piece of Pool Party C/S to 1" x 9 1/4". Wrap around the card base, not too tight, starting and ending in the front. I do this so that the seam will be covered. Once you have wrapped the belly band around the card, remove it and burnish the score lines well. Wrap around again and glue the end of the band to form the belly band. Make sure not to get glue on the card base. You want the belly band to be easily slipped off and on.


Cut a piece of the Textured Shimmer Paper to 4 1/4" x 7/8" and attach to the front of the belly band. This paper adds such a nice sparkle and texture!!

Die cut a tag from the Sentimental Park Dies in Basic White C/S. These tags are so intricate and dainty!

Stamp the flowers onto the tag using the floral image from the Sentimental Park Stamp Set. I used 2nd generation Pool Party Ink to stamp the flowers. What does second generation mean? It means I inked up the stamp with the Pool Party Ink, then I stamp off one time onto scrap paper, then stamp onto the label. This creates a lighter ink tone. 


Stamp the sentiment in Memento Black Ink using the Dainty Delight Stamp Set over top of the flowers.

Attach the label to the belly band using Dimensionals.

Die cut some tiny flowers from the Sentimental Dies using Starry Sky C/S. I used 1 big flower and 2 small flowers. Attach them to the label on the bottom left using tiny dots of Multi-Purpose Liquid Glue. 

Add some Rhinestones to the flowers.

For the inside I cut a piece of Basic White C/S to 4" x 5 1/4" and I stamped a floral image from the Dainty Delight Stamp Set using Starry Sky Ink. 


Give this card style a try for yourself!                                     
Happy Stamping and Creating! 

Arlene                                   


Product List

Paper Snips
[103579]
$15.00