Showing posts with label Fresh Freesia Ink. Show all posts

Monday, May 29, 2023

The Best Is Yet To Come!

 The Best Is Yet To Come!

This is another card I taught at the beginners card class. It's always so impressive to see the magic of heat embossing!
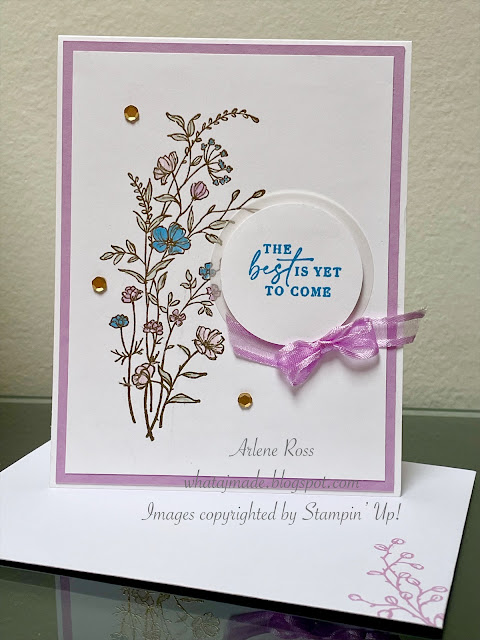

Directions:

Cut a piece of Thick Basic White Card Stock to 4 1/4" x 11" and score at 5 1/2".

Cut a piece of Fresh Freesia C/S to 4 1/8" x 5 3/8" and attach it to the card base.

Cut a piece of Basic White C/S to 3 7/8" x 5 1/8". Stamp the floral image using VersaMark Ink, sprinkle Gold Embossing Powder over the image, tap off and heat set.

Using Stampin' Blends, colour in the flowers and leaves. I used: Light Soft Sea Foam, Light Fresh Freesia and Light Azure Afternoon. I wanted the colours to be soft and light.

Attach this layer to the card base.

Using Azure Afternoon Ink, stamp the sentiment onto Basic White C/S. Punch out using the 1 3/4" Punch or Stylish Shapes Dies.

I just love this sentiment! Such a positive message!

Punch out a 2" Vellum C/S circle or die cut the circle with Stylish Shapes.

Attach the sentiment to the Vellum circle using Dimensionals. Then attach it to the card front.

Attach a ribbon bow using a Glue Dot and add some Gold Sequins to finish off the card. I used Fresh Freesia Ribbon but it has retired so any ribbon you have would be great. 


Don't forget to stamp your envelope and inside of the card!

Thanks for stopping by today!

Happy Stamping and Creating!

Arlene

To order any of the products I have used today just click on the image and you will be directed to my on-line store. I appreciate all orders. Thank you!

If your order is $60.00 or more I will send you this card!! Or this card: You choose!

Product List

Paper Snips
[103579]
$15.00

Tuesday, January 4, 2022

Flowing Flowers

 Flowing Flowers

While I do have many floral stamp sets, I simply could not resist another one! One of my favorite style of stamp sets is the "Distinctive" stamps from Stampin' Up! These stamps create different opacities in a single stamped image. They are amazing! 

I used one of the NEW Flowing Flowers stamp and Fresh Freesia Ink to repeatedly stamp onto my Fresh Freesia Card Stock base. I love the variation in the tones and depth of the flowers.


I die cut a Basic White C/S label from the Meadow Dies and stamped my sentiment using Fresh Freesia Ink. I added a small rectangle of Basic Black C/S behind the tag. I finished it up with a Black Organdy Glittered Ribbon. I also decorated my envelope by repeatedly stamping on the back flap with a smaller floral image from the same set using Fresh Freesia Ink. 


This set also has many sentiments with beautiful fonts!

It's also Sale-A-Bration time at Stampin' Up! For every $60.00 order before tax and shipping you can choose a FREE item from the SAB Catalogue! 

Check out the Catalogues on the right side bar of my Blog!

Happy Stamping and Creating!

Arlene

Product List
Meadow Dies
[155852]
$52.00
Paper Snips
[103579]
$13.50

Saturday, October 2, 2021

Northern Lights Alcohol Inking Card

Northern Lights Alcohol Inking Tutorial    


Free tutorial to celebrate World Card Making Day!!!


Supplies:

Stamp: Time Of Giving

Card Stock: Basic White and Vellum

Ink: Fresh Freesia

Dies: Giving Gifts

Accessories: Stampin’ Blends; Fresh Freesia Dark, Misty Moonlight Dark and Night Of Navy Light and Wink of Stella

Embossing Folder: Snowflakes

Miscellaneous: Rubbing Alcohol 99%


Directions:

Cut a card base of Basic White to 4 1/4” x 11” and score at 5 1/2”. 


Cut another piece of Basic White C/S to 4” x 5 1/4”. 


Die cut the Giving Gifts Santa Die near the top/center of the Basic White panel. When you die cut out the Santa and Sleigh it creates your rectangle window opening for the Vellum to show through.


Then emboss this panel with a Snowflake Embossing Folder (or a star or any Christmas embossing folder) Die cut another Santa and sleigh to glue/layer overtop of the embossed Santa and sleigh. This will add some strength and also not be embossed. 


Cut a piece of Vellum to 3 3/4” x 4”. Using Stampin’ Blends, scribble and add colour all over the Vellum. 


Using 99% rubbing alcohol, dip a small paint brush into the alcohol and dab over the scribbled lines. You just want the colours to bleed and soften the harsh marker lines. If you get some puddling, use a tissue to dab the excess off. Once dry, splatter with some rubbing alcohol to create some spots. Let dry again and splatter with Wink Of Stella. 


Cut a strip of this Vellum panel off to layer under the sentiment strip.


Attach the remainder of the Vellum to the card base using adhesive in the 4 corners. You want the Vellum panel to be behind the die cut. Attach the Basic White die cut panel to the card base and over top the Vellum, using Dimensionals. 


Stamp a sentiment on a Basic White C/S strip using Fresh Freesia Ink. Attach to a strip of the left over Vellum that is slightly larger. Attach to the card front using Dimensionals. 


Add some Rhinestones to finish the card off. 


Designed By Arlene Ross

aj.ross@telus.net

whatajmade.blogspot.com

Images©1990-2021Stampin’Up!®


Product List 

Paper Snips
[103579]
$13.50