Showing posts with label Pretty Peacock C/S. Show all posts

Tuesday, September 12, 2023

(New Post) Fun Fold!

 Fun Fold Card

The Masterfully Made Designer Series Paper is so colourful that it can stand alone all by itself! I only added a few embellishments to finish off the card.


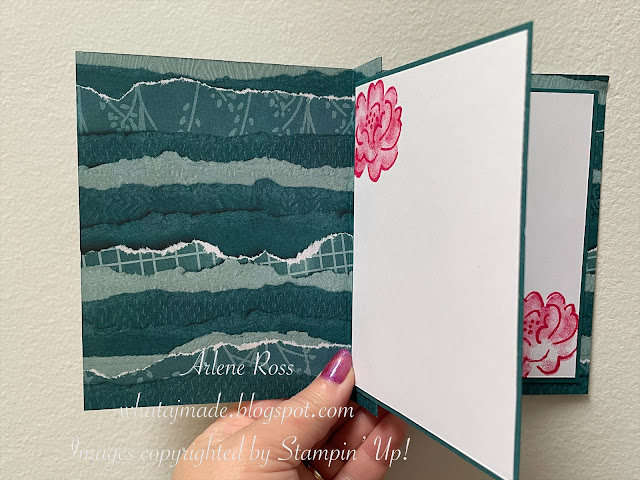
This card is also a simple fun fold and it has lots of room to write a message for the recipient. 


Directions For Fold:

Cut the Masterfully Made Designer Series Paper to 10 1/2" x 5 1/2". Be mindful of the pattern direction when cutting your DSP.


Score at 4 1/4", 5 1/4" and 6 1/4". 


Fold and burnish with the center fold (spine) inside. 


Turn over and add Multi-Purpose Liquid Glue to the inside of the spine and glue closed. 


Inside of the card with the spine glued closed. (I used a different piece of DSP for these photos)
  

Card Inside:                                                                                    
 Cut 2 pieces of Basic White Card Stock to 3 7/8" x 4 7/8". 

On both pieces of the Basic White C/S, stamp a flower. The flower outline is stamped in Melon Mambo Ink full strength and the inside of the flower is stamped in second generation Melon Mambo Ink. (Stamped off 1x on scrap paper for a lighter look). I stamped one flower on the top and one flower on the bottom of the second Basic White C/S inside pieces. 


Attach these layers to Pretty Peacock C/S cut to 4" x 5" and attach to the card insides. One is glued to the "spine" and the second one is lined up with the first one and glued to the inside back. *Tip: for the layer attached to the spine, only add glue to the left side of the layer. 


Card Front:

Using the Bough Punch and the Soft Shimmer 12 x 12 Specialty Paper, punch out some leaves. I used the Berry Burst and Pretty Peacock Shimmer Paper. Set aside. I punched out 1 big and 1 little bough from each color. 

On a scrap piece of Basic White C/S stamp the sentiment using Pretty Peacock Ink. Angle cut one end. I used the  sentiment "Sending You Sunny Thoughts" from the Trucking Along Stamp Set. What a great sentiment! Anyone could benefit from sunny thoughts!!

Die cut a decorative border strip from the Darling Details Dies using Berry Burst Shimmer paper. Attach it to the sentiment strip on the bottom then attach the sentiment to the card front using Dimensionals. 

Using Glue Dots or Multi-Purpose Liquid Glue, attach the punched out leaves, tucking them slightly under the sentiment. 

Add a double Lemon Lime Twist bow to the left side of the sentiment.

Finish the card off with a sprinkling of Adhesive Backed Sequins. 


The card back is just as beautiful as the front! Look at the dimension! It really is paper! The Stampin' Up! artist hit this one out of the park!


Don't forget to decorate the envelope too! 

I hope you have enjoyed todays card and get some time to be creative today. 

If you live in Canada I would love to be your Demonstrator. 

Shop with me Here. Thank you 💜 

If you want to order any of the products I used today simply click on the image below and you will be directed to my on-line store.

Happy Stamping and Creating!

Arlene


Product List

Bough Punch
[157711]
$30.00
Paper Snips
[103579]
$15.00

Monday, May 3, 2021

Farewell Pretty Peacock!

 Farewell Pretty Peacock!

I will sure miss Pretty Peacock. I just had to make one more card using it. 

This card is also my design for the Freshly Made Sketches this week.


I started with a Pretty Peacock card base, then a layer of Basic White then another layer of Pretty Peacock that I embossed using the Tasteful Textiles 3D Embossing Folder.
I glued a Gold Hoop onto the card front then I added a large detailed Shimmery White Card Stock butterfly die cut from Brilliant Wings. I added a double bow and a sentiment. 


I hope you enjoyed todays card! 

Please sign up for my Blog posts on the right side, that way you won't miss any of my posts :)

Happy Stamping and Creating,

Arlene

Product List
Paper Snips
[103579]
$13.50
Paper Snips
[103579]
$13.50

Friday, March 19, 2021

Pretty Peacock Floral


Pretty Peacock Floral Card


It is almost time to say goodbye to one of my favorite colours, Pretty Peacock. It is such a beautiful colour, and I will miss it!  Soon we will have 5 new In-Colours to fall in love with!!

If any of the 2019-2021 In-Colours are your favourites, remember that they and all products associated with them will be retiring! Order now to avoid disappointment. 

Here are the directions for todays card.

The card base is Pretty Peacock cut to 4 1/4" x 11" and scored at 5 1/2".

The Basic White layer is 3" x 4 1/4". The Pretty Peacock layer is 4" x 2 3/4". Emboss this layer using the Painted Texture Embossing Folder. Attach the Pretty Peacock layer to the Basic White layer, then attach them to the card front using Dimensionals.

Die cut a large oval from the Stitched Shapes Dies using Basic White Card Stock.

Stamp the flower from "Flowering Blooms" using Memento Black Ink onto the oval.

I used the Light Pool Party Stampin' Blends and outlined the image. I really like the look this creates. 


Attach the oval to the card front using Dimensionals.

Tie a small double bow using the Pool Party Sheer ribbon, attach to the card using a Glue Dot.

Add a few Rhinestones to finish it off.

Happy Stamping and Creating!

Arlene 

All the products I have used for todays card are shared below. Click on any image and you will taken to my on-line shop. 

Product List 

Paper Snips
[103579]
$13.50