Showing posts with label Fun Fold. Show all posts

Friday, February 21, 2025

Floating Hexagon Adventurous Sky Card

Floating Hexagon Adventurous Sky Card 

This is such a great fun fold! I had a lot of fun designing this card with the Adventurous Sky Bundle. 


There are lots of samples and videos on-line showing how to create this fun fold. 

Here are my directions:

Cut Thick Basic White Card Stock to 5 3/4" x 5 3/4" score both ends at 1 1/2". Fold both ends into a valley fold. This is the card base.

Cut 2 pieces of Thick Basic White C/S to 6 3/4" x 1 1/2". Score both at 1/2", 2 1/2", 4 1/4" and 6 1/4". Fold all score lines into mountain folds. These are the struts.

Cut 2 pieces of the Take To The Sky Designer Series Paper to 5 1/4" x 1" and 2 pieces of Basic Black C/S to 5 1/2" x 1 1/4". Attach the DSP to the card stock layers and attach to both sides of the card base.

Cut 1 piece of DSP to 5 1/4" x 2 1/4" and 1 piece of Basic Black C/S to 5 1/2" x 2 1/2", attach the DSP to the C/S and attach to the center of the card base.

Cut 4 pieces of DSP to 1 1/2" x 1" and Basic Black C/S to 1 3/4" x 1 1/4", attach together and adhere to the corners sections of the struts.

Cut 2 pieces of DSP to 1 1/4" x 1" and 2 pieces of Basic Black C/S to 1 1/2" x 1 1/4", attach together and adhere to the middle sections of the struts.

Add some adhesive to the left side tab of one strut and lining it up with the top edge of the card base, glue it to the back of the card base. Do this to the second strut on the bottom left lining it up with the bottom edge. ONLY attach the struts on the left side at this time. See photo.


Cut 3 pieces of Window Sheet: 2 at 5 1/2" x 1/2" and 1 at 5 1/2" x 5/8". Using Glue Dots, attach the wider Window Sheet to the inside of the center section of the strut and the other 2 to each side of the struts on the sides. See photo. This is where your planes and clouds attach to so they appear to be "floating".


Attach the right sides of the 2 struts to the back of the card base completing the "hexagon" shape.

Stamp 1 big airplane and 2 small airplanes using Memento Black Ink onto Basic White C/S. Die cut and colour using Stampin' Blends. 


Stamp the clouds in Boho Blue Ink onto Basic White C/S then die cut or fussy cut. (I found it faster to fussy cut them).

Using Glue Dots, attach the 3 airplanes to the Window Sheets. 


Attach the clouds to the Window Sheets and to the inside of the card. I used Dimensionals on the inside clouds. I attached the inside clouds last so I could position them so they wouldn't be blocked by view from the planes. 

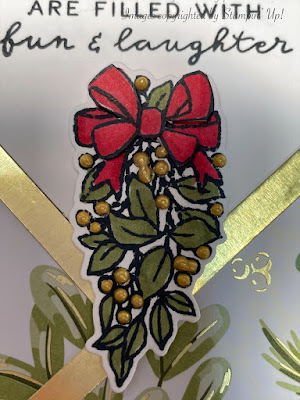
Die cut a Silver Foil propeller and attach it to the big airplane. I then added a Black Matte Dot or a Rhinestone coloured with a black Sharpie Marker to the center of the propeller.

I added some Wink Of Stella to the clouds.

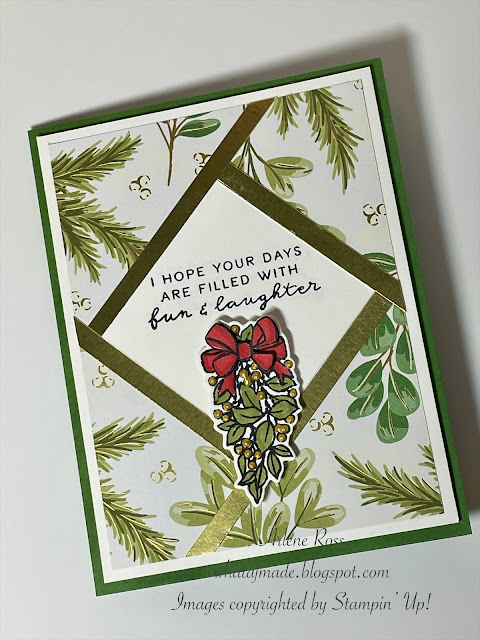
Stamp the sentiment using Memento Black Ink onto Basic White C/S, flag trim one end and attach to a slightly larger piece of Poppy Parade C/S. Attach to the bottom middle section using Dimensionals. 

You can add your message to the back of the card base.

I hope you can find some time to try out this fun fold!

Have you heard about Stampin' Up's Sale-A-Bration promotion? It's a great time to place an order because you can earn FREE products!! There is only 6 days left of this yearly promotion! Check out the brochure below.

Sale-A-Bration 2025

Stampin' Up! has also added a few more items available to earn for FREE!

Sale-A-Bration additional items.

In other news, Stampin' Up! has added some New Kits to their Kit Collections
.

So Much To Celebrate Kit $20.00
DETAILS
- Makes 9 cards: 3 each of 3 designs
- 2 folded card sizes
- 4-1/4" x 5-1/2" (10.5 x 14.9 cm): 6 cards
- 6" x 3" (15.2 x 7.6 cm): 3 cards
- Sentiments printed in Dutch, English, French, and German
- Colours: Balmy Blue, Old Olive, Pecan Pie, Petal Pink, Pumpkin Pie

Kit includes one of each item listed below.
- Step-by-step instructions
- 9 printed envelopes
- Puffy stickers
- Gold foil
- Adhesive
- A 9-7/8" x 6-1/2" x 2-3/4" (25.1 x 16.5 x 7 cm) printed box for storage or crafting on the go


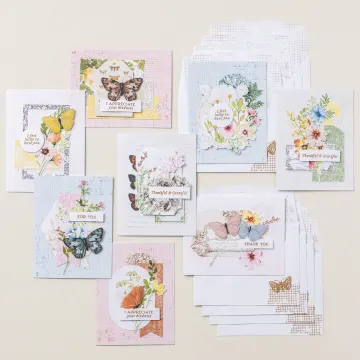
How stunning is this Kit!!
Heirloom Arrangements Kit $32.00

Do you love the convenience of crafting with an all-inclusive kit but wish it offered a little more wiggle room for creativity? Then the Heirloom Arrangements Kit is perfect for you! With detailed vintage designs, eight card options, and loosely choreographed instructions, you can let your creativity shine and still have everything you need for your projects right at your fingertips.

DETAILS
- Makes 8 cards: 1 each of 8 designs
- Folded card size: 4-1/4" x 5-1/2" (10.5 x 14.9 cm)
- Colours: Basic Black, Blueberry Bushel, Cajun Craze, Cherry Cobbler, Crumb Cake, Daffodil Delight, Garden Green, Old Olive, Pecan Pie, Pretty in Pink, Pretty Peacock
- Also available in French

Kit includes one of each item listed below.
- Heirloom Arrangements Photopolymer Stamp Set
- Clear stamp block
- Pecan Pie Classic Stampin’ Spot
- Basic instructions
- 8 printed envelopes
- Precut elements
- Specialty vellum
- Adhesive
- A 9-7/8" x 6-1/2" x 2-3/4" (25.1 x 16.5 x 7 cm) printed box for storage or crafting on the go

Happy Stamping and Creating!

Arlene


Product List

Friday, January 31, 2025

Fun Fold Easel Card & Lola's Birthday!

 Fun Fold Easel Card

I love making easy fun folds and this one is very easy! I used the gorgeous Floral Delight Designer Series Paper again, it is just so pretty!!


Directions: 

Start with a piece of Pool Party Card Stock cut to 5 1/2" x 8 1/2" and score it at 4 1/4".

Open up the card, place it in your Stampin' Up! Trimmer and cut on the long side at 1 3/8" up to the score line, repeat of the other side. * See photo.

   
                                                                   𑁋𑁋𑁋 Score   ⎯⎯⎯ Cut                                                                     

On the middle section only, score at 2 1/8". Mountain fold it.

Attach a 3" x 4 1/8" piece of Basic White C/S to the inside then glue down both of the flaps.

Attach a 1 1/4" x 4 1/8" piece of the Floral Delight DSP to each flap.

Cut a 2 1/2" x 4" piece of Basic White C/S (I used a Radiating Stitches Die for mine).

Stamp a Pool Party Ink heart onto this layer using the Free Sale-A-Bration set "Heart Shaped".


See how you can earn this set for FREE! ⤵


Using the Free Heart Shaped Dies, die cut a Daffodil Delight C/S heart and attach it over top of the stamped heart.

Attach this layer to the middle pop up adding glue to only on the bottom section.


Die cut 2 Pool Party C/S hearts, 1 Daffodil Delight Heart and 4 Soft Sea Foam leaves, all from the Heart Shaped Die Set.

Die cut a Basic White label and stamp "thank you" in Pecan Pie Ink. Attach to the card over top of the heart.

Attach the flowers using Dimensionals and 2 of the leaves using Multi-Purpose Liquid Glue.

Stamp the trio of flowers in Pool Party Ink and die cut. Attach them using Dimensionals to the inside of the card about 2/3 of the way down, this acts as the stopper for the middle portion of the card so it will stand up. Attach the 2 remaining leaves using glue.

I also coloured all my flowers with some Wink Of Stella. Add some Rhinestone Gems to finish it off!

The card folds flat for mailing!


I hope you have enjoyed todays card and I hope I have inspired you to try this fun fold!

Today is a very special day, our Miss Lola Bean turns 14 today!!! 🎂

How time flies!!! 


                                  Here she is last winter in the snow!! She is not 

                                 a fan of the snow! We have to dig a path for her. 

                                                 Such a sweet pup!

                                               Happy birthday Lola!!


Happy Stamping and Creating!

Arlene


Tuesday, August 13, 2024

Christmas Fractured Card

 Christmas Fractured Card

I really enjoy making these "Fractured" cards. I find them very interesting to look at and they are super easy!! That's my kind of card!

I used the beautiful Sophisticated Sled Bundle for todays cards and the Season Of Gold And Green Designer Series Paper. These are both On-Line Exclusive products and not in any Catalogue.


164324

SEASON OF GREEN & GOLD 12" X 12" (30.5 X 30.5 CM) SPECIALTY DESIGNER SERIES PAPER

$23.00

164134

SOPHISTICATED SLED BUNDLE (ENGLISH)

$72.75


You can order all of the products that I have used for todays cards below in the "Product List". Just click on the photo and it will take you directly to my store. 

I love the "pop" of red!


Cutting Guide

 Cut Garden Green Card Stock 4 1/4" x 11" score at 5 1/2", this is the card base. I also cut one of the bases at 5 1/2" x 8 1/2" and scored at 4 1/4". Either works great! Set aside.

 Cut Basic White C/S: 4" x 5 1/4" and another piece @ 2 1/4" x 2 1/4".

 Cut 4 strips of Gold Glimmer or Gold Foil Paper 1/4" x 6".

Cut the Season Of Green And Gold Designer Series Paper to  3 3/4" x 5".

Directions

Stamp your sentiment using Memento Black Ink onto the       2 1/4" x 2 1/4" Basic White C/S piece, turn it so it becomes a diamond shape. Stamp the sentiment more towards the top of the diamond. 

Also stamp the bough from the Sophisticated Sled Stamp Set using Memento Black Ink onto a scrap of Basic White C/S and die cut with the co-ordinating die set. Stamp another bough just were the ribbon is and fussy cut it out.


Attach the sentiment to the center of the DSP in a diamond shape. 


Take the first strip, add a little bit of Multi-Purpose Liquid Glue to it and lay it tight up to the Basic White C/S sentiment on the bottom right side and even with the edge of the square. It will go off the DSP and hang over. *See photos.

*TIP-I try to gauge how much of the strip needs glue on it so I don't have a gluey mess!


Next, add another strip tight up against the sentiment piece and butting up to the first strip, again it will go off the edge of the paper. 


Continue with strip 3 and 4. 


Turn the DSP over and trim off all the excess strips.


Attach this DSP layer to the Basic White C/S layer then attach it to the card base using Dimensionals. 

Colour the bough and the ribbons using Mossy Meadow, Real Red and Pecan Pie Stampin' Blends. One of the bows I did in Real Red Blends the other was done in Pecan Pie Blends.


 Using tiny cut up pieces of Dimensionals attach the fussy cut bow over top of the other bow for a 3D look. *See photo.


Attach the bough to the card front using Dimensionals.

Add tiny dots of the Gold Metallic Enamel Effects to all the berries on the bough. Set aside to dry.


Card Inside

 I stamped a Memento Black Ink wreath onto a 3 3/4" x 5" piece of Basic White C/S. 

I coloured it with Mossy Meadow Stampin' Blends and also used the Gold Enamel Effects on the berries. Leave the card open until it dries. 


Don't forget to decorate your envelopes!


I hope you have enjoyed todays fun fold card and have some time to create one for yourself! 

Stampin' Up! is having a huge sale on select Designer Series Papers! 15% off! 


Click here to view the sales flyer. DSP Sale

The gorgeous Winter Meadow DSP is one of the ones on sale!!


WINTER MEADOW 12" X 12" (30.5 X 30.5 CM) DESIGNER SERIES PAPER #162133

$14.45 $17.00


Happy Stamping and Creating!
Arlene
Product List
Gold Glimmer Paper
Gold Glimmer Paper
[146958]
$6.75