Showing posts with label Radiating Stitches Dies. Show all posts

Friday, January 31, 2025

Fun Fold Easel Card & Lola's Birthday!

 Fun Fold Easel Card

I love making easy fun folds and this one is very easy! I used the gorgeous Floral Delight Designer Series Paper again, it is just so pretty!!


Directions: 

Start with a piece of Pool Party Card Stock cut to 5 1/2" x 8 1/2" and score it at 4 1/4".

Open up the card, place it in your Stampin' Up! Trimmer and cut on the long side at 1 3/8" up to the score line, repeat of the other side. * See photo.

   
                                                                   𑁋𑁋𑁋 Score   ⎯⎯⎯ Cut                                                                     

On the middle section only, score at 2 1/8". Mountain fold it.

Attach a 3" x 4 1/8" piece of Basic White C/S to the inside then glue down both of the flaps.

Attach a 1 1/4" x 4 1/8" piece of the Floral Delight DSP to each flap.

Cut a 2 1/2" x 4" piece of Basic White C/S (I used a Radiating Stitches Die for mine).

Stamp a Pool Party Ink heart onto this layer using the Free Sale-A-Bration set "Heart Shaped".


See how you can earn this set for FREE! ⤵


Using the Free Heart Shaped Dies, die cut a Daffodil Delight C/S heart and attach it over top of the stamped heart.

Attach this layer to the middle pop up adding glue to only on the bottom section.


Die cut 2 Pool Party C/S hearts, 1 Daffodil Delight Heart and 4 Soft Sea Foam leaves, all from the Heart Shaped Die Set.

Die cut a Basic White label and stamp "thank you" in Pecan Pie Ink. Attach to the card over top of the heart.

Attach the flowers using Dimensionals and 2 of the leaves using Multi-Purpose Liquid Glue.

Stamp the trio of flowers in Pool Party Ink and die cut. Attach them using Dimensionals to the inside of the card about 2/3 of the way down, this acts as the stopper for the middle portion of the card so it will stand up. Attach the 2 remaining leaves using glue.

I also coloured all my flowers with some Wink Of Stella. Add some Rhinestone Gems to finish it off!

The card folds flat for mailing!


I hope you have enjoyed todays card and I hope I have inspired you to try this fun fold!

Today is a very special day, our Miss Lola Bean turns 14 today!!! 🎂

How time flies!!! 


                                  Here she is last winter in the snow!! She is not 

                                 a fan of the snow! We have to dig a path for her. 

                                                 Such a sweet pup!

                                               Happy birthday Lola!!


Happy Stamping and Creating!

Arlene


Sunday, February 11, 2024

BEE My Valentine

 BEE My Valentine

Greetings from beautiful Sointula B.C.! 

I'm up here again visiting my Mom and Dad. I made sure to take a few completed cards with me so I could do some Blog Posts! 

This is a super cute Valentine's Day card using the Bee My Valentine Bundle. Isn't that Bee so adorable!!


All the supplies I used to make todays card are listed below. 

Directions:

Die cut a 3 3/4" x 5" Lemon Lolly Card Stock rectangle using the Radiating Stitches Die.

Die cut out centre using a Deckled Rectangle Die. Add lots of Dimensionals to the back of the frame, close to the inside edge.

Emboss a 3 1/2" x 5" piece of Basic White C/S using the Softly Sophisticated Embossing Folder. Attach the frame over this piece. 

Cut a Thick Basic White Card Stock base, 4 1/4" x 11" scored at 5 1/2".

Attach a 4 1/4" x 5 1/2" piece of Bright & Beautiful Designer Series Paper to the card base. Attach frame/embossed piece using a few more Dimensionals to the card front.

Using Lemon Lolly C/S, stamp Bee stripes and face in Memento Black, stamp body using Lemon Lolly Ink. Punch out Bee body.

Stamp antenna in Black onto Lemon Lolly C/S, punch out. *It's the heart shaped part of the punch.  Glue behind Bee body.

Using a Light Petal Pink Blends Marker, add Bee cheeks!

Stamp wings with Pool Party Ink onto Vellum C/S. Set aside to dry. Then glue behind Bee body.


Splatter Bee with some Wink Of Stella. Attach Bee to the card using Dimensionals.

Punch out some Sweet Sorbet C/S "hearts". Attach with Mini Dimensionals. Add a white dot to the hearts. 

Add some adhesive to the bottom right corner, then loop some Sweet Sorbet Ribbon back and forth, pressing into the adhesive.


Stamp sentiment using Sweet Sorbet Ink onto Basic White C/S. Fussy cut out. Attach with Mini Dimensionals overtop of ribbon.

I stamped the Bee inside the card as well using the same inks. 


When I'm visiting Sointula I always try to spend some time on the beach. I love all the treasures I find. 

Isn't this a fitting find, a heart rock with a perfect heart dry spot! Just in time for Valentine's day! 💜

Just chillin'


The Sointula/Alert Bay Ferry


I threw some leftovers onto the beach. Look who joined in on the feast!


This is a view of some of the mountains on my drive up. Just a bit of snow up there.
I hope you enjoyed todays card ands some of my photos from Sointula.
Don't forget it is still Stampin' Up's annual Sale-A-Bration event. Don't miss out on getting some free exclusive products. 


If you need any help just drop me an email here:

Here is the Sale-A-Bration Catalogue 2024.


Stampin' Up! released even more free items to the Sale-A-Bration offerings!


Happy Stamping and Creating!
Arlene

Product List

Paper Snips
[103579]
$15.00

Friday, June 23, 2023

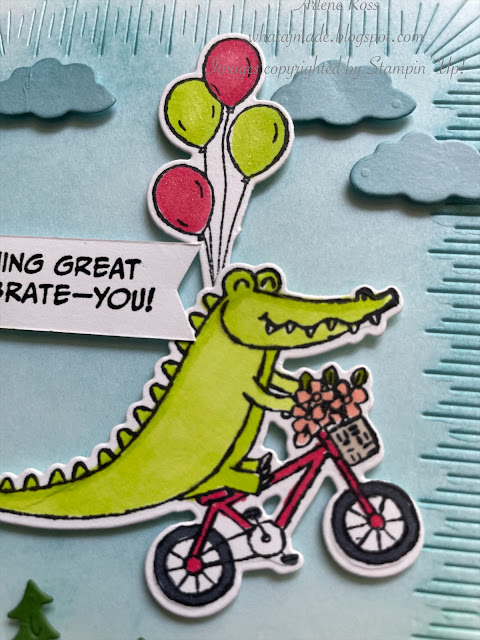
Zany Zoo Happy Birthday Card

 Zany Zoo Happy Birthday Card

It was our Grandsons 7th birthday recently so I needed a super cute card! I immediately reached for the Zany Zoo Bundle, I knew it was the perfect set to design a card for him.


Directions:

I started with Parakeet Party Card Stock cut to 8 1/2" x 5 1/2" and scored at 4 1/4" for the card base.

Using Basic White C/S, die cut the largest of the Radiating Stitches Dies rectangle.

Using the Blending Brushes, add some Parakeet Party Ink to the bottom of the rectangle and Balmy Blue Ink to the top of the rectangle. Start off adding a very light layer, then apply more ink until you are happy with the results. 

Die cut some clouds using Balmy Blue C/S and some trees using Garden Green C/S. I also sponged a bit of Balmy Blue Ink onto the clouds.

Stamp the alligator/bike in Memento Black Ink and the balloons from the raccoon onto Basic White C/S. Die cut out. You don't need all of the raccoon, just the balloons.

Colour the alligator/bike and balloons using Stampin' Blends. I used: Real Red, Black, Crumb Cake, Calypso Coral, Parakeet Party and Old Olive. 


Stamp the sentiment in Memento Black Ink onto Basic White C/S. Flag cut one end.

Attach the alligator/bike using Dimensionals. Tuck the balloons behind the alligator and use Dimensionals to attach them.

Add the clouds and trees using Dimensionals. 

Attach the sentiment using Dimensionals.


I hope you liked todays fun card!!
Happy Stamping and Creating!
Arlene


Thank you so much!!

Product List

Paper Snips
[103579]
$15.00