Pop-Up Pocket Card and Free Shipping Today!


While some of the items I have used have retired, use what you have on hand! Make it your own.
Directions:
Cut the Sweet Sorbet Card Stock base to 4 1/4" x 11" and score at 2" and 7 1/2".
Rub the inside of the base with some wax paper so everything will move smoothly.
On the smaller section of the base, add Tear And Tape Adhesive to just the 2 side edges, fold up to create the pocket.

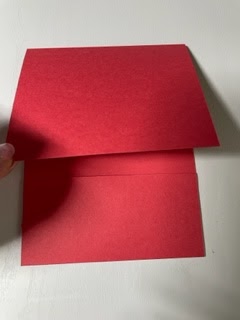


Attach the 1 3/4" x 4" piece to the bottom section of the base and the 3 1/4" x 4" piece to the top section of the base.

Cut a piece of Thick Basic White Card Stock to 3 1/2" x 7" and score at 1/2" and 5". Fold and Burnish well as shown in the photo below. Rub the back of this layer with the wax paper.
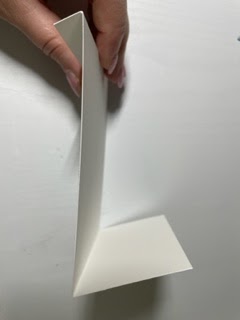
Stamp on the pop-up portion. Stamp the image and/or sentiment up fairly high so it shows up when the card flap pops up.
Add adhesive to the front of the small 1/2" scored section.

Tuck the Basic White C/S pop up panel inside the card base pocket as shown in the photo below. Line up the edge of the pop up panel to the score line on the card base, center it, then close the card. This will attach the pop up to the base exactly where you want it! Easy peasy!


Now you can decorate the card front!
I die cut a large Balmy Blue C/S flag using the Stylish Shapes Dies and attached it to the card front using Multi-Purpose Liquid Glue.
Die cut a medium sized Basic White circle from the Stylish Shapes Die.
Punch out a Vellum Decorative Circle. Attach over top of the Balmy Blue C/S flag.
Stamp some flowers onto the circle using Balmy Blue Ink, I stamped off 1 time for a softer look. Then I stamp the sentiment over top of the flowers using Night Of Navy Ink. Attach this circle using Dimensionals over top of the Vellum.
Tie some Balmy Blue Ribbon around the bottom section and tie into a knot. Add a charm or embellishment. I had some leftover charms from the past so I used up some of those. I used Linen Thread to attach the charm.
For the inside pocket, I added a tea bag. You could also use a gift card, cash, small package of candy, package of flat embellishments, chewing gum, pack of stickers or a little note.....so many possibilities!
Here are some more!


Have fun with this Pop-Up Pocket Card! Use up some of that Designer Series Paper you might have laying around. If you are anything like me, you have lots!!!! Cut into it, use it, enjoy it!
🛒🛒🛒 Shop with me HERE. Thank you!
Happy Stamping and Creating!
Arlene
** The Regency Park Designer Series Paper is on the retiring list, get it before it is gone forever!! Sadly the Speedy Recovery Stamp Set is already sold out.
*** Don't forget, today is FREE Shipping over at Stampin' Up! on orders over $100.00
Product List  |  | ||
 | |||
 |  |  |  |
 |  |  |  |
 |  |  |  |
 |


