Showing posts with label Charming Sentiments Stamp Set. Show all posts

Tuesday, January 31, 2023

(New Post) Scenic Garden Cards

 Scenic Garden Cards

The images from the Scenic Garden Stamp Set are so beautiful. I made 3 cards using this set and I kept it very simple. I just stamped the image in Memento Black Ink and then I used my Stampin' Blends to add some colour. 

I kept the images simple because I was wanting to showcase the Dandy Designs Designer Series Paper. I used this DSP as my card base! Such a great way to not only show off the DSP but to use it up too!! I confess, I am a DSP hoarder! 

The Dandy Design DSP is a Sale-a-bration 2023 FREE offering with a $120.00 purchase! You can also earn the Scenic Garden Stamp Set for free with a qualifying order.


Directions:

For all the cards I started with a card base of the Dandy Designs Designer Series Paper cut to 4 1/4" x 11" and scored at 5 1/2".

I cut a piece of Basic White Card Stock to 4 3/4" x 3 1/2" for the art panel on all the cards.

Stamp the images with Memento Black Ink and colour using the Stampin' Blends.

Stamp the sentiment from Charming Sentiments using Memento Black Ink.

Attach this art panel to the coordinating card stock colour cut to 4 7/8" x 3 5/8". Attach to the card base. I used Calypso Coral and Balmy Blue.

For the inside attach a 4" x 5 1/4" piece of Basic White C/S. I stamped the hollyhock in Memento Black Ink.

Add a Dragonfly Trinket and some Basic White Bakers Twine to finish off the cards!!

This set would make such a nice gift for someone! Come back soon, I will make a matching holder for the cards!


Today is Miss Lola Beans 12th birthday!! She's partied out!!

I hope you like todays cards!! Leave me a comment. I love to hear from you!

Happy Stamping and Creating!

Arlene


Product List

Friday, May 20, 2022

Gift Bag With Coordinating Set Of Cards

 Gift Bag With Coordinating Set Of Cards

I will be participating in my first Craft Fair this Winter at my local Mall, Tsawwassen Mills in Delta B.C. I'm so excited and have been very busy crafting away! It is a 4 day event so I will need lots of inventory! 

I saw this adorable and easy gift bag on The Paper Pixie blog and I knew it would be perfect for the Craft Fair! Check out Julies Blog for all the details and assembly instructions. Thanks Julie for inspiring me!

I used the beautiful Sun Prints Designer Series Paper for the gift bag. 

I added some Gold Glimmer butterflies to the front and a white ribbon for the handles. The Gold and Rose Gold Specialty Paper or Gold Foil would also be perfect for the butterflies!

For this card I started with a 5 1/2" X 8 1/2" piece of Night Of Navy Card Stock scored at 4 1/4". 

I used the Butterfly Brilliance Stamp Set and Night Of Navy Ink to add the butterflies to the card front. This stamp is a large background stamp. *Tip: After you ink up the stamp, lay it down on your work surface, ink side up, and lay your card stock over the inked stamp, use a piece of scrap paper to gently rub the stamp to transfer the ink to the C/S. It's much easier than lifting up the stamp.

I then stamped the sentiment onto a piece of Basic White C/S, flag cut one end and attach it to the card base using Dimensionals. Add a Gold butterfly for a great pop of sparkle!

This card starts with a Basic White C/S base, 4 1/4" X 11" scored at 5 1/2". 

Cut a piece of the Sun Prints Designer Series Paper to 3 3/4" X 5" and emboss using the new Cascading Ruffles Embossing Folder. This is an easy way to add texture to a card. Attach it to the card front using Multi-Purpose Liquid Glue.

Add a sentiment and a few gold butterflies. Quick and easy but very elegant.


Again I stamped the card front with the Butterfly Brilliance Stamp and Night Of Navy Ink.

Die cut a Basic White C/S tag using the Tailor Made Tags Dies and stamp a sentiment using Night Of Navy Ink. 

Add a White Bakers Twine triple bow and a small gold butterfly to the tag. Attach the tag to the card front using Dimensionals. 

Again I stamped the butterflies onto the card front using Night Of Navy Ink and the Butterfly Brilliance Stamp.

Die cut a 2 1/2" Basic White C/S circle. 

Stamp some butterflies onto the circle using Balmy Blue Ink and the Butterfly Brilliance Stamp Set. Attach the circle to the card front using Dimensionals. 

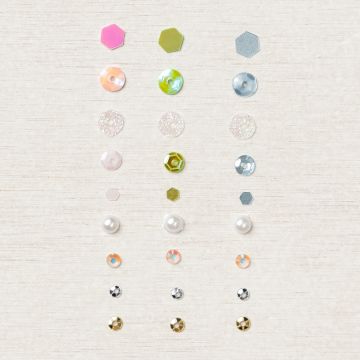
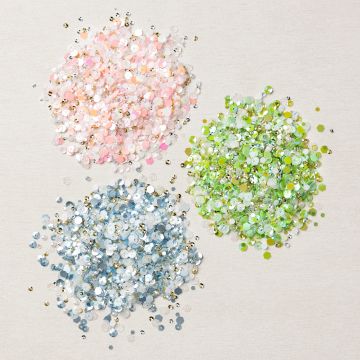
Add a die cut gold butterfly to the circle and some gorgeous "For Everything Fancy Sequins". Did you see these sequins in the 2022-2023 Annual Catalogue? They are on page 141. They are amazing! They will last forever and have so many different bits and pieces! They come in 3 different tubs for simple storage.

FOR EVERYTHING FANCY SEQUINS

FOR EVERYTHING FANCY SEQUINS

This bag will hold up to 6 cards with matching envelopes.


I hope I have inspired you today with my projects.

Happy Stamping and Creating!

Arlene

Live in Canada? Shop HERE with me. 

Join my team HERE. Check out this awesome deal on the Stampin' Up Starter Kit!


Product List For Todays Projects

Paper Snips
[103579]
$15.00